TCP-IP AT Examples
This document describes detailed examples of running TCP/IP AT Command Set commands on the device.
Device as UDP Server — Single Connection with UART Wi-Fi Transparent Transmission
Device as TCP Client — Single Connection with UART Wi-Fi Transparent Transmission
Device as TCP Server — Single Connection with UART Wi-Fi Transparent Transmission
Large text request over TCP SSL (HTTPS) (disable CR/LF in the serial tool for this example)
Device as TCP Client — Single Connection
Set Wi-Fi mode to station.
Command:
AT+WMODE=1,1
Response:
OK
Connect to the router.
Command:
AT+WJAP="aithinker","1234567890"
Response:
+EVENT:WIFI_CONNECT

OK

+EVENT:WIFI_GOT_IP
Note:
The SSID and password you enter may differ from those in the commands above. Use your router’s SSID and password.
Query the device IP address.
Command:
AT+WJAP?
Response:
+WJAP:3,aithinker,1234567890,14:de:39:06:86:e4,WPA2 TKIP,
7c:b9:4c:1d:c6:39,6,192.168.3.142,192.168.3.1

OK
Note:
Your query result may differ from the response shown above.
Connect the PC and the device to the same router.
On the PC, use a network debugging tool to create a TCP server. For example, IP
192.168.3.162, port6666.The device connects to the TCP server as a client at IP
192.168.3.162, port6666.Command:
AT+SOCKET=4,192.168.3.162,6666
Response:
connect success ConID=1

OK
Send 9 bytes of data.
Command:
AT+SOCKETSEND=1,9
Response:
>
Enter 9 bytes of data. For example, if the input is
aithinker, AT will output the following:OK
Receive 9 bytes of data.
If the TCP server sends 9 bytes of data (
aithinker), the system will prompt:+EVENT:SocketDown,1,9
Send the AT+SOCKETREAD=<ConID> command to read data from the specified connection.
Command:
AT+SOCKETREAD=1
Response:
+SOCKETREAD,1,9,aithinker
Device as TCP Server — Multiple Connections
The following example shows the device as softAP creating a TCP server. As station, connect to a router first, then follow the same steps.
Set Wi-Fi mode to softAP.
Command:
AT+WMODE=2,1
Response:
OK
Configure softAP.
Command:
AT+WAP="aithinker778","12345678",6,3,0
Response:
OK
Query softAP information.
Command:
AT+WAP?
Response:
+WAP:aithinker778,12345678,WPA/WPA2 AES,6,3,0,7c:b9:4c:1d:c6:39,1.168.43.1,192.168.43.1
Client Num: 0

OK
Note:
The address you query may differ from the response shown above.
The PC must connect to the Wi-Fi hotspot created by the device to be on the same subnet.
On the PC, use a network debugging tool to create a TCP client and connect to the device’s TCP server.
Create TCP server.
Command:
AT+SOCKET=3,6666
Response:
OK
1.发送 9 字节数据到网络连接 ID 为 2 的链路上。
Command:
AT+SOCKETSENDLINE=2,9,aithinker
Response:
OK
Note:
If input exceeds length n set by
AT+SOCKETSENDLINE, only the first n bytes are sent, thenOK.
Receive 9 bytes on connection ID 2.
If the TCP server sends 9 bytes of data (
aithinker), the system will prompt:+EVENT:SocketSeed,2,1
Send the AT+SOCKETREAD=<ConID> command to read data from the specified connection.
Command:
AT+SOCKETREAD=2
Response:
+SOCKETREAD,1,9,aithinker
Close the TCP connection.
Command:
AT+SOCKETDEL=2
Response:
OK
2.发送 9 字节数据到网络连接 ID 为 3 的链路上。
Command:
AT+SOCKETSENDLINE=3,9,aithinker
Response:
OK
Note:
If input exceeds length n set by
AT+SOCKETSENDLINE, only the first n bytes are sent, thenOK.
Receive 9 bytes on connection ID 3.
If the TCP server sends 9 bytes of data (
aithinker), the system will prompt:+EVENT:SocketSeed,3,1
Send the AT+SOCKETREAD=<ConID> command to read data from the specified connection.
Command:
AT+SOCKETREAD=3
Response:
+SOCKETREAD,1,9,aithinker
Close the TCP connection.
Command:
AT+SOCKETDEL=3
Response:
OK
Device as UDP Server — Single Connection with UART Wi-Fi Transparent Transmission
Set Wi-Fi mode to station.
Command:
AT+WMODE=1,1
Response:
OK
Connect to the router.
Command:
AT+WJAP="aithinker","1234567890"
Response:
+EVENT:WIFI_CONNECT

OK

+EVENT:WIFI_GOT_IP
Note:
The SSID and password you enter may differ from those in the commands above. Use your router’s SSID and password.
Query the device IP address.
Command:
AT+WJAP?
Response:
+WJAP:3,aithinker,1234567890,14:de:39:06:86:e4,WPA2 TKIP,
7c:b9:4c:1d:c6:39,6,192.168.3.142,192.168.3.1

OK
Note:
Your query result may differ from the response shown above.
Connect the PC and the device to the same router.
On the PC, use a network debugging tool to create a UDP client and connect to the device’s UDP server.
On the PC, connect as a UDP client to the device UDP server at IP
192.168.3.142, port6666.Command:
AT+SOCKET=1,6666
Response:
connect success ConID=1

OK
Receive 9 bytes of data.
If the UDP client sends 9 bytes (
aithinker), the system will prompt:+EVENT:SocketDown,1,9
Send the AT+SOCKETREAD=<ConID> command to read data from the specified connection.
Command:
AT+SOCKETREAD=1
Response:
+SOCKETREAD,1,9,aithinker
Send 9 bytes of data.
Command:
AT+SOCKETTT
Response:
>
Enter 9 bytes of data. For example, if the input is
aithinker, AT will output the following:OK
Close the UDP connection.
Command:
AT+SOCKETDEL=1
Response:
OK
Device as UDP Client — Single Connection
Set Wi-Fi mode to station.
Command:
AT+WMODE=1,1
Response:
OK
Connect to the router.
Command:
AT+WJAP="aithinker","1234567890"
Response:
+EVENT:WIFI_CONNECT

OK

+EVENT:WIFI_GOT_IP
Note:
The SSID and password you enter may differ from those in the commands above. Use your router’s SSID and password.
Query the device IP address.
Command:
AT+WJAP?
Response:
+WJAP:3,aithinker,1234567890,14:de:39:06:86:e4,WPA2 TKIP,
7c:b9:4c:1d:c6:39,6,192.168.3.142,192.168.3.1

OK
Note:
Your query result may differ from the response shown above.
Connect the PC and the device to the same router.
On the PC, use a network debugging tool to create a UDP server. For example, IP
192.168.3.162, port6666.The device connects to the UDP server as a client.
Command:
AT+SOCKET=2,192.168.3.162,6666
Response:
connect success ConID=1

OK
Send 9 bytes of data.
Command:
AT+SOCKETSEND=1,9
Response:
>
Enter 9 bytes of data. For example, if the input is
aithinker, AT will output the following:OK
Receive 9 bytes of data.
If the UDP server sends 9 bytes (
aithinker), the system will prompt:+EVENT:SocketDown,1,9
Send the AT+SOCKETREAD=<ConID> command to read data from the specified connection.
Command:
AT+SOCKETREAD=1
Response:
+SOCKETREAD,1,9,aithinker
Close the UDP connection.
Command:
AT+SOCKETDEL=1
Response:
OK
Device as TCP Client — Single Connection with UART Wi-Fi Transparent Transmission
Set Wi-Fi mode to station.
Command:
AT+WMODE=1,1
Response:
OK
Connect to the router.
Command:
AT+WJAP="aithinker","1234567890"
Response:
+EVENT:WIFI_CONNECT

OK

+EVENT:WIFI_GOT_IP
Note:
The SSID and password you enter may differ from those in the commands above. Use your router’s SSID and password.
Query the device IP address.
Command:
AT+WJAP?
Response:
+WJAP:3,aithinker,1234567890,14:de:39:06:86:e4,WPA2 TKIP,
7c:b9:4c:1d:c6:39,6,192.168.3.142,192.168.3.1

OK
Note:
Your query result may differ from the response shown above.
Connect the PC and the device to the same router.
On the PC, use a network debugging tool to create a TCP server. For example, IP
192.168.3.162, port6666.The device connects to the TCP server as a client at IP
192.168.3.162, port6666.Command:
AT+SOCKET=4,192.168.3.162,6666
Response:
OK
Enter UART Wi-Fi transparent transmission mode and send data.
Command:
AT+SOCKETTT
Response:
>
Stop sending data
During transparent transmission, if a standalone
+++packet is detected, the system exits transparent send. Wait at least 1 second before sending the next AT command. Typing+++on a keyboard may be too slow to be recognized as three consecutive+characters.Important
Use
+++to exit transparent transmission mode and return to receive mode; the TCP connection remains active. UseAT+SOCKETTTto resume transparent transmission.Close the TCP connection.
Command:
AT+SOCKETDEL=1
Response:
OK
Device as TCP Server — Single Connection with UART Wi-Fi Transparent Transmission
Set Wi-Fi mode to station.
Command:
AT+WMODE=1,1
Response:
OK
Connect to the router.
Command:
AT+WJAP="aithinker","1234567890"
Response:
+EVENT:WIFI_CONNECT

OK

+EVENT:WIFI_GOT_IP
Note:
The SSID and password you enter may differ from those in the commands above. Use your router’s SSID and password.
Query the device IP address.
Command:
AT+WJAP?
Response:
+WJAP:3,aithinker,1234567890,14:de:39:06:86:e4,WPA2 TKIP,
7c:b9:4c:1d:c6:39,6,192.168.3.142,192.168.3.1

OK
Note:
Your query result may differ from the response shown above.
Connect the PC and the device to the same router.
On the PC, use a network debugging tool to create a TCP client. For example, IP
192.168.3.142, port6666. Query with AT+WJAP?The network tool connects to the device as a TCP client at IP
192.168.3.142, port6666.Command:
AT+SOCKET=3,6666
Response:
connect success ConID=1

OK
Enter UART Wi-Fi transparent transmission mode and send data.
Command:
AT+SOCKETTT
Response:
>
Stop sending data
During transparent transmission, if a standalone
+++packet is detected, the system exits transparent send. Wait at least 1 second before sending the next AT command. Typing+++on a keyboard may be too slow to be recognized as three consecutive+characters.Important
Use
+++to exit transparent transmission mode and return to receive mode; the TCP connection remains active. UseAT+SOCKETTTto resume transparent transmission.Close the TCP connection. Use the client connection ID plus 1 for the parameter.
Command:
AT+SOCKETDEL=2
Response:
OK
Large text request over TCP SSL (HTTPS) (disable CR/LF in the serial tool for this example)
Set Wi-Fi mode to station.
Command:
AT+WMODE=1,1\r\n
Response:
OK
Connect to the router.
Command:
AT+WJAP="aithinker","1234567890"\r\n
Response:
+EVENT:WIFI_CONNECT

OK

+EVENT:WIFI_GOT_IP
Note:
The SSID and password you enter may differ from those in the commands above. Use your router’s SSID and password.
Set socket to receive mode.
Command:
AT+SOCKETRECVCFG=1\r\n
Response:
OK
Create socket connection (SSL).
Command:
AT+SOCKET=7,httpbin.org,443\r\n
Response:
OK
Note:
The server domain or IP you connect to may differ. Enter your target server domain or IP.
Send specified-length data through the socket.
Command:
AT+SOCKETSEND=1,237\r\n
Response:
OK
Note:
Your connection ID and byte length may differ. Use your actual connection ID and length.
Byte count must use CRLF format.
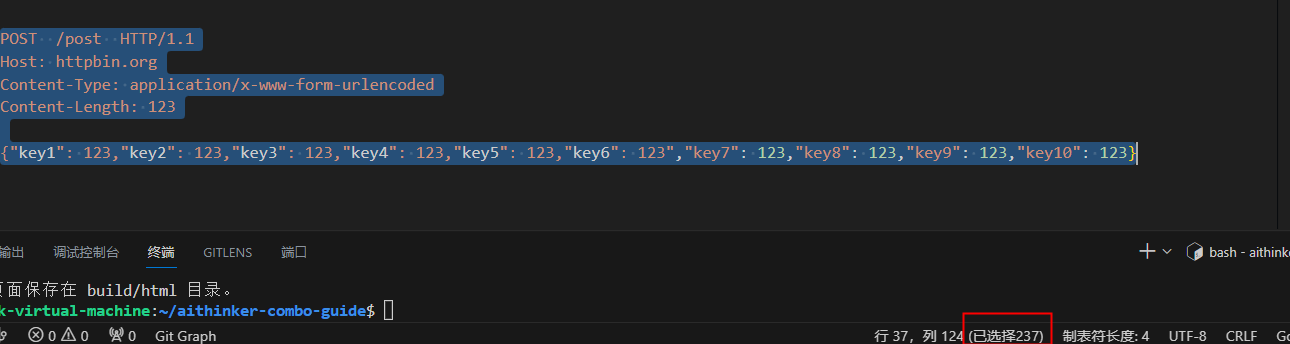
出现”>”后发送指定长度数据。
Command:
POST /post HTTP/1.1\r\nHost: httpbin.org\r\nContent-Type: application/x-www-form-urlencoded\r\nContent-Length: 123\r\n\r\n{"key1": 123,"key2": 123,"key3": 123,"key4": 123,"key5": 123,"key6": 123","key7": 123,"key8": 123,"key9": 123,"key10": 123}Response:
{
"args": {},
"data": "",
"files": {},
"form": {
"{\"key1\": 123,\"key2\": 123,\"key3\": 123,\"key4\": 123,\"key5\": 123,\"key6\": 123\",\"key7\": 123,\"key8\": 123,\"key9\": 123,\"key10\": 123}": ""
},
"headers": {
"Content-Length": "123",
"Content-Type": "application/x-www-form-urlencoded",
"Host": "httpbin.org",
"X-Amzn-Trace-Id": "Root=1-64e576bf-30fc9a971f2aace64ef99f95"
},
"json": null,
"origin": "120.234.24.230",
"url": "https://httpbin.org/post"
}

OK
Note:
Your request fields may differ. Use your actual request fields.
Escape characters are required when sending from the MCU.